
This recent (2018 – 2019) job was one of the most interesting and satisfying we have done in quite a while. It was both of these things because it was a real tradesman’s job and that is what this company is really about. Although we advertise for chimney work on this site, and we have done lots in the past, BCM Steeplejacks is not really a chimney steeplejacking company these days. What we are about is conservation and trades work, and doing work to a standard that we can take a pride in. This job ticked all of these boxes.
We are also quite proud of the fact that we can do these jobs without involving any sub-contractors. No joiner was involved in this job at any point as we have the skills in house (which saves us the trouble and obvious health and safety issues of having to get a joiner with zero background in working at height up the inside or outside of a church spire). We specified the timber, took all the measurements, did all of the ground level joinery / preparation, all of the fitting up inside the steeple, and all the simpler finishing up tasks like painting the louvres and fitting the mesh.
The job needed done because the existing softwood louvres were falling to pieces and the standard lightweight pigeon net (that so many contractors fit – but shouldn’t) was ripped to shreds. This meant that the steeple, from top to bottom, had turned into a pigeon’s paradise and they were slowly but surely destroying the place. Their guano is acidic and accelerates the rotting of timber, and they turn anywhere they live into a health hazard.
We were asked to prevent the pigeons (or any other birds) getting in, so we specified new African Sapele (a little like mahogany) hardwood louvres and heavy 12 gauge galvanised mesh.
Unlike so many churches the client did not try to save a few pounds by insisting on cheaper softwood. They went for a quality timber that will last far far longer, and this was another thing that helped to make this such an engaging job. All the way through it we knew that what we were fitting was the best of stuff. It helps when you know you are using the right materials for the job. It would have been a shame to do all that work (as this job really was a lot of work) and have installed low grade timber that has no real chance of lasting for any significant time.
Click on any picture to enlarge. Click again on the picture to shrink it down again.
The pictures below show the louvres and inside of the steeple before work started.

Pigeons living inside the steeple.


The inside of the steeple was a mess, as this picture shows. If you look at the pictures (of the interior) at the bottom of this page you’ll see we removed all of that muck, timber and other mess, and left the place extremely tidy.


Brand new Sapele hardwood delivered to site.

Stacked inside the steeple ready for use.

The first of the old louvre windows removed. The old pigeon net wires are still on and were removed later. There’s still a dead pigeon hanging off them here.

Once we had the first louvre removed we used the side uprights as a template for creating the new uprights. To maintain the appearance of the steeple we set the angle and spacing of the new cuts to be the same as the old. However, we did change the thickness of the blades. The old blades were only 20mm thick. Our new blades are 25mm thick for extra strength and longevity.
What you see below is a plunge router set in a jig built on site. The jig sets the angle of the router cuts and this ensures that every single cut runs at exactly the same angle. This means that all the blades that sit into these cuts are also set at exactly the same angle (all 168 of them).

Right and left louvre blades laid side by side to ensure all cuts are perfectly parallel (they were). Once the right upright was cut we laid it on top of the left and marked the position of the cuts from one to the other. This ensured nothing was out of alignment.


Both uprights in place, and fitting the louvre blades. Once we fitted an upright on one side a laser level was used to set the position of the upright on the other side. This was important as if the uprights were not perfectly level then neither would the louvre blades be.

All uprights were secured with 3 strong bolts.

Another shot showing the fitting of the new louvre blades.

Not one single timber was fitted without having been first coated on the ground. This was to prevent rot in future. Obviously bare timber will rot much faster than painted timber. We use an extremely high quality timber preserving paint (the paint cost on this job was £540 ). It’s expensive but worth it as it adds years and years to the lifespan of timber.

Just an overview of the “workshop”.

A window with all louvres fitted.

All blades were secured with 4 screws, but the screws are just to firm things up. What actually holds the louvres in place is a combination of gravity and the existing masonry. If you look at the picture below you will see that each louvre blade has a check cut out at either end. The non-checked part of the louvre sits against the stonework and cannot slide any further down as a result. This is a standard way of securing louvres and works very well.

Another fully fitted set of louvres.

First coating a side upright.

Louvre blades with checks cut out at either end. The checks need painted before going up to be fitted.

Checks now painted and ready for fitting.

Fitting the blades. Impact driver used to drive the screws. All louvre blades were individually measured and marked with their size so that there was no confusion during the fitting phase. The pencil was covered later when we applied the 2nd and 3rd coats of paint (as were the screw heads and upright retaining bolts).

We used 25mm thick marine plywood for the arch at the top of the windows. A template was taken up inside to allow us to cut them to the correct profile.

As with everything else, the arches were also first coated before fitting.

3 bolts were used to secure the top of the arch to the masonry, and metal brackets were used to secure the bottom of the arch to the top louvre (you will see this in pictures further down the page).

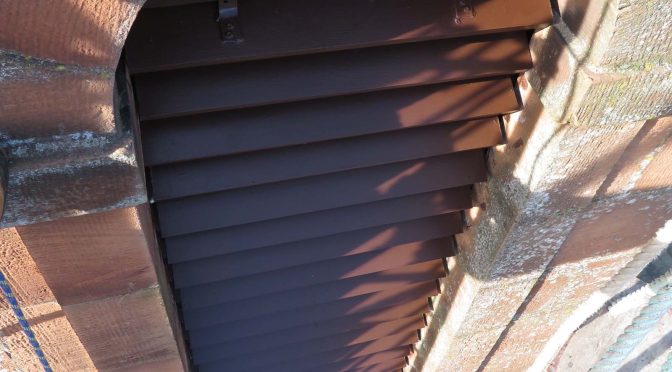
This window is now complete. We have given it two further coats of paint once fitted, and the 12 gauge galvanised mesh is cut to size and ready to be fitted.

Mesh in place. Note the quality galvanised clips screwed in place. It’s a strong way to secure the mesh and it looks good. We could just hammer staples in to do this, but we think the clips are worth a few extra minutes per window.

The following pictures show the finished louvres from inside and outside.


There was an interesting add on to this job. The bell was dangerous and quite close to going through the floor. We re-suspended it – safely this time. You can read more about that part of the work HERE.