
We recently carried out a large church spire rebuilding job in Glasgow. There were multiple problems with the top of the spire – partly stemming from old age, and partly stemming from a building company who had previously carried out work at the top of the spire with no understanding of how the head of a church spire is actually meant to be stabilised. Most spires were built a long time ago (mostly during the 1800s). The architects and builders of the time fully understood how to make the top of a spire secure, but it’s largely forgotten knowledge now – apart from within the steeplejack industry.
The main problems we found are listed below.
The timber “cross tree” down inside the spire is an essential component in stabilising the top of a spire. This one was constructed of old timber and rotting, and the centre rod was loosely held down onto it (it should be bar tight). It needed to be replaced with a new stainless steel cross tree beam.
The centre rod that drops from the top of the spire down to the cross tree was made of ferrous metal and heavily corroded. This badly cracks the top of spires because rusting metal expands with unstoppable force. It had to be removed and replaced with stainless steel, and for this to be done the top of the spire had to be dismantled (you can’t get them out without dismantling the masonry – at least most of the time it’s not possible, and it wasn’t here).
The weathervane was rusting away and no longer safe (if left much longer pieces of corroded steel would have fallen off). It needed taken to the blacksmiths and completely refurbished (most of it was replaced).
The weathervane was hardly secured to the top of the spire. It needed to be properly anchored in position. It’s extremely well anchored now!
Below you will find some pictures of the job with some descriptive text.
All of the pictures can be enlarged by clicking on them. Click on them a second time to reverse the process.
The first task was to erect a full steeplejack scaffold. In this picture were are beginning that job.

Looking down at the first lift of the scaffold.

These two pictures show the completed scaffold.


The next task was to dismantle the spire head. In this picture were are lifting a heavy stone with a chain block.

These courses of masonry consist of much smaller stones and can be lifted off by hand.

The spire is now dismantled down to the point where it changes from being a solid to a hollow structure. You are looking down the inside here.
You will notice the carpet on the scaffold. It’s there to stop stones and other debris from falling to the street below.

A better view down the inside of the spire. What you are seeing here is the old cross tree arrangement. As mentioned before, these timbers were old and pretty rotten. They were no longer fit for purpose and have been removed.

This is how we left the spire overnight to stop huge amounts of water pouring into the spire – it worked well.
You can see the courses of masonry stacked ready for rebuilding. We always stack each course together, and in the same positions they were in while built.

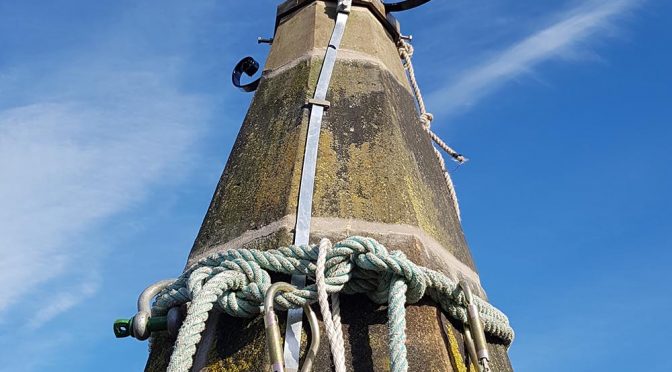
After we rebuilt the spire we heavily insulated the new mortar with two long sheets of hessian wrapped round it multiple times.

Once the building at the top was done we moved inside the spire to start the internal works. First we removed the old timber cross tree. We then installed a new stainless steel 150mm x 150mm box beam into custom cut pockets in the spire walls. It’s extremely strong and will outlive the masonry into which it’s built.

This is just another shot of the new stainless cross tree beam – this time from the underside.
You can see our steeplejack ladders. These are temporary – they were taken down once the work was completed.

While we were doing all this on site the weathervane / finial was at our blacksmiths being reconstructed. The bronze base and the central rod were reused, but all the decorative metal was replaced (the old stuff was paper thin / falling to bits). All the new metalwork has been coated with a red oxide primer paint.

Lifting the refurbished finial back up to the top of the spire.

What you are seeing here is a new 20mm thick stainless steel compression plate, and a new 30mm diameter stainless steel centre rod being installed (lowered down into position).
The centre rod will be powerfully tensioned up at the cross tree beam below, which will pull this plate downwards and put all of the masonry between the cross tree beam and the compression plate into compression. This changes the physical characteristics of the top of the spire. Without this compression the top of the spire is just a lot of separate stones held together with mortar, and with no inherent stability. With the compression the top of the spire becomes, effectively, a single chunk of masonry with great weight and a low centre of gravity, which results in excellent stability. It’s a simple but beautiful way of stabilising the head of a church spire – and it’s also very necessary!

The weathervane / finial ready to be mounted onto the compression plate. It sleeves over the top of the centre rod and is secured by multiple 12mm stainless steel grub bolts (it’s extremely solid).

Back inside the spire now. This is a view of the very tip of the spire with the new stainless steel centre rod installed. You can also see new mortar as these are newly rebuilt stones.

This picture shows the centre rod dropping down into the cross tree beam. Everything is fully installed and tensioned now.

Looking up at the cross tree and centre rod from underneath. You can see the nuts on the bottom of the centre rod. These have been tensioned up extremely tightly (two lock nuts and a thread locking compound were used to ensure no future slackening).

Here you can see the top of the weathervane with a thick coat of copper grease applied – ready for reinstallation of the cockerel (they rotate with the wind to show wind direction to anyone that cares to look up).

Reinstalling the cockerel.

Painting the cockerel with three coats of a specialist metal paint.
The main weathervane steel was painted with three coats of black bitumastic paint (not the shiniest paint in the world, but longevity is important up here and bitumastic paint lasts a long time).

Looking up at the finished spire head. We had started stripping our scaffold by this time, which is why you can see our fall arrest blocks.

A view of the top of the spire from ground level.
The scaffold was off by this time and we had been touching up pointing that could not be done while the scaffold was on (there were scaffold tubes in the way of the joints). This is why there’s a band of hessian around the spire – it’s protecting new mortar.
A nice job to have added would have been to point the rest of the spire so it all looks the same, but it’s not necessary yet and I’m sure the church won’t want to pay for it until it really needs done.
